Whoever processes a lot of graphics and photos often has the problem that only a small image section is needed from a large-format image. Even this image section is still so large with today’s cameras that the selection must be proportionally reduced in order to display the image section on the Internet, for example. Proportionally, so that there is no distortion, otherwise a round head becomes an egg head. This article shows how to make the selection and reduce it with the lightweight graphics programme Paint.Net.
Paint.Net selection Set image crop
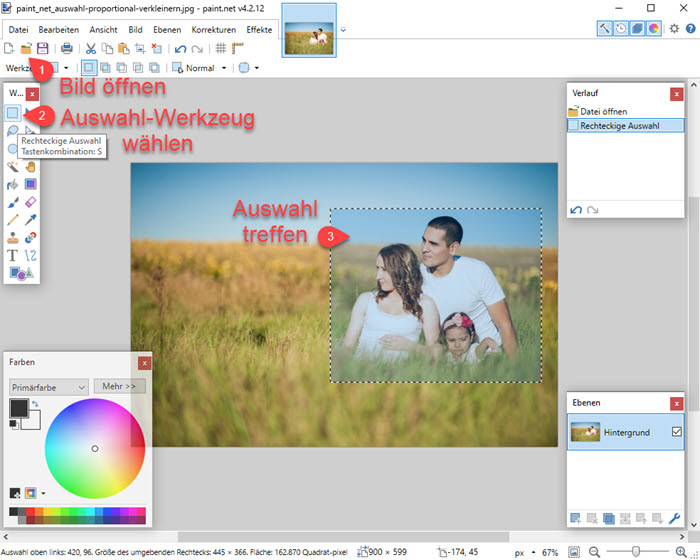
1st step: open image
Open image via the menu File -> Open or via the shortcut Ctrl+O
2nd step: Use selection tool
By dragging with the mouse, you can now select the desired section of the image.
3. Step: Copy image section
Now press the key combination Ctrl+C or go to the menu Edit and click Copy.
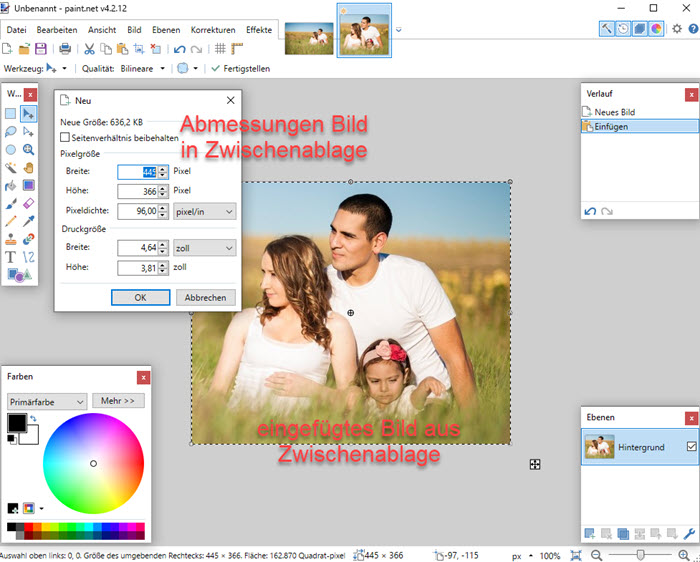
4th step: Paste image section into new image
Use the shortcut Ctrl+N or the menu File->New to create a new, empty image. A dialogue appears in which you can enter the dimensions of the image. You do not need to change anything here, because Paint.Net takes over the dimensions of the image in the clipboard.
Paint.Net: Reduce image size
Now it may be that the image section you have taken is still too large, because, for example, for display on the Internet you should always pay attention to fast loading times and thus with images you always have to find an optimum between memory requirements and display.
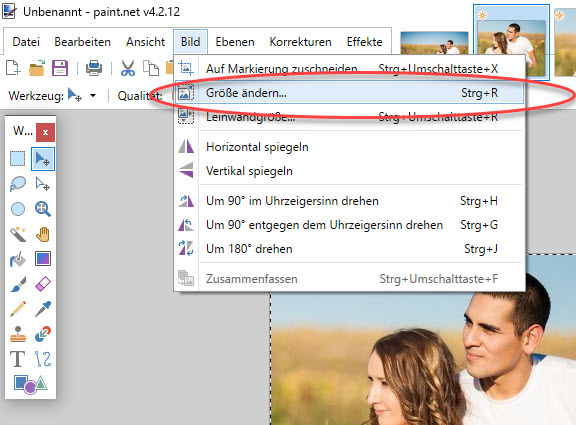
To reduce the size of the new image (our image section), use the key combination Ctrl+R or go via the menu Image->Resize… .
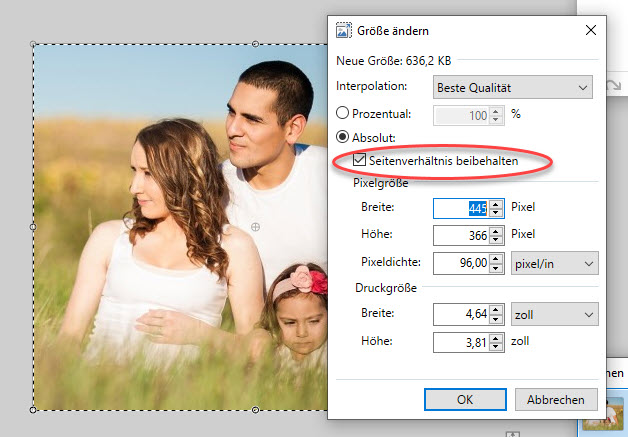
In the dialogue that now opens, you can enter the new width or new height. The other value is then calculated automatically. Please note that the checkbox “Keep aspect ratio” must be ticked. This is the only way to maintain the proportions and scale the image or photo proportionally.
Now all you have to do is save the new image in the desired image format by pressing Ctrl+S (key combination) or via the menu File -> Save as. In most cases, the image format will be either PNG or JPEG. JPEG is better suited for photos and all images where a lot of colours and colour gradients appear. PNG is best used whenever you have images with few different colours. These are often screenshots of computer programmes or self-created sketches or drawings, such as those you can create with Visio.
Conclusion
With Paint.Net, it is relatively simple to proportionally scale a section of an image. Only a few clicks and steps are necessary and you have the new image in a few seconds. Beyond that. Paint.Net may not replace a full-fledged graphics programme, as these offer a few more functions, but for most users the range of functions should be sufficient and the purchase of another expensive graphics programme should not be worthwhile. In this context, it should be mentioned that Paint.Net is available as a free version. You can also get it from the Windows Store for a small fee. Why you have to pay money for it in the Windows Store and can download it for free elsewhere is a matter of conjecture. Maybe the developers have to pay a fee to Microsoft or Microsoft wants to earn money for the distribution via the Microsoft Store?




Thanks for share in your formation
thanks for share in your information